How To Setup VPNArea on Asus Router with Merlin firmware

Guide for setting up OpenVPN on AsusWRT.


Please download the zip file containing the configuration files which you will need later.


This guide will work for all VPNArea servers except Canada-0-NFLX and Italy-0-NFLX. If you need those two servers, please select alternative ASUS guide from Members Area.


Step 1

Browse to your router's configuration page, normally you can do so by visiting http://192.168.1.1/  or http://192.168.2.1
If you don't know what the username and password are, look at the back of your router where this information should be visible.


Step 2

Navigate to the "WAN" tab on your left and set the setting "Connect to DNS server automatically" to "No". Then enter DNS servers 1.1.1.1 and 1.0.0.1 as your DNS-Server-1 and DNS-Server-2 options. (see screenshot below)


Step 3

Make sure MTU setting is with value: 1500


Step 4

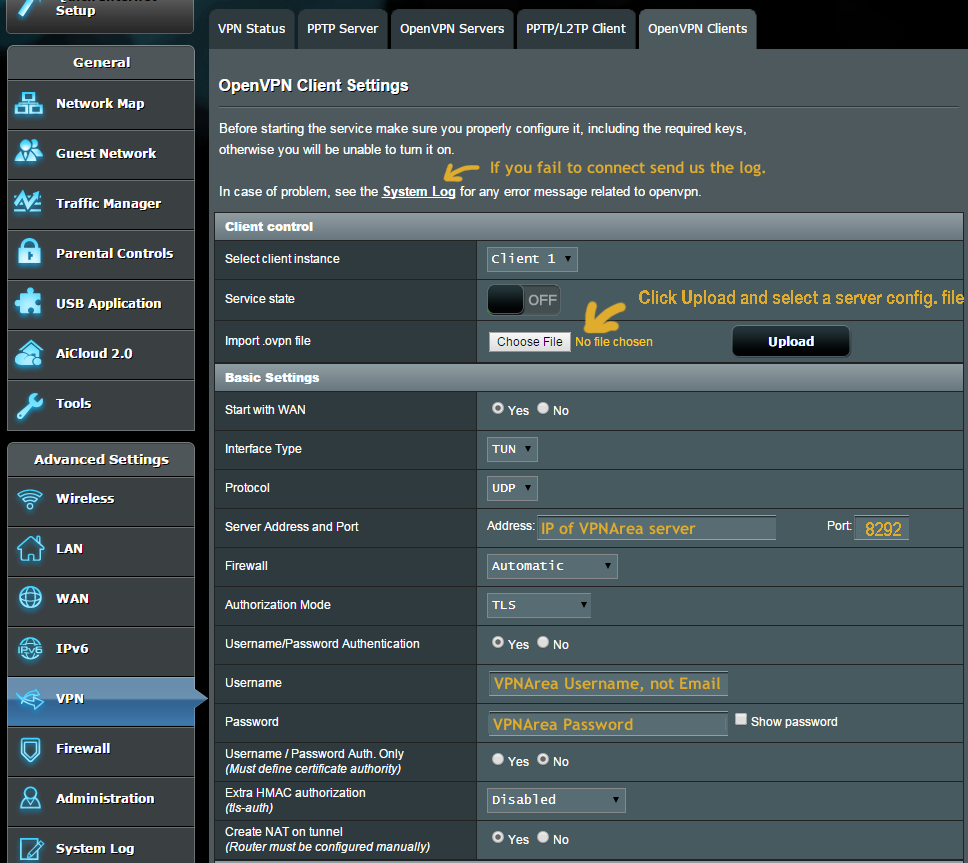
Now navigate to the VPN tab further down and then click on the "OpenVPN Clients" sub-tab on the right of the screen.


Step 5

Now is the time to download the Configuration files from the "Setup Files" link at the top of this guide and unzip them in some folder on your computer.

Go back to your Router's control panel in "OpenVPN Client" tab and click on the "Choose file" link on the right of: "Import .ovpn file".

Once the file-selection box pops up, navigate to the folder where you unzipped the configuration files and select the file name of the server you want to connect to and click "Import/Open"

Step 6

Look for the "Username/Password Authentication" setting, it must be "Yes".

Now enter your VPNArea username (not email) in the "Username:" field and your Password in the "Password:" field.

Look further down where it says "Advanced Settings". Make sure the following setting is set as shown below:

"Encryption cipher: "AES-256-CBC"

At the bottom you will also see the "Custom Configuration" box. Verify if the following lines are present:

ns-cert-type server

mtu-disc yes

auth SHA256

Now please click the "Apply" button at the bottom to save all those settings.


WARNING: if you click "Service status - ON" without applying the settings first they will be lost.


Step 7

Scroll to the top of the page and switch the "Service status" to "ON" in order to connect.


Visit IPLeak.org to verify that your IP address changed and that you have successfully connected.


If you encounter any trouble or difficulties connecting please go to: Advanced Settings > System Log


Copy/paste to us all the messages from there to us in a LiveChat (to initiate LiveChat click the icon at the bottom right corner) or in a Supoprt Ticket from the Contacts page, this will help us diagnose what is preventing your router from connecting.