HowTo & Setup for VPN Area on Windows

Download the latest VPNArea 2.0 App for Windows by clicking the button below:


Older Version (1.0.56) available here:


NOTE: If you are on Windows 7, please use the older 1.0.56 version.
China users on Windows 7 may not be able to connect to our services, due to our stealth technology working only on our newest software version which requires Windows 8, 10 or higher.


Step 1

To download VPNArea click on the "VPNArea App" button above.

Once the download of the software is finished double click on the VPNArea.exe installation file to begin the installation.


Step 2

Once the installation window appears, click Next

Step 3

Click Finish to complete the installation and start VPNArea.


Step 4

Once the app has started you will see Username and Password boxes. Fill in your VPNArea Username (not email) and Password details there. Click "Save username/password" and then click "Servers List"

Step 5

Now select a server and click "Connect" button, or simply double-click on the server of your choosing.
If you click "Recommended" tab, you'll see servers near you.

Learn More

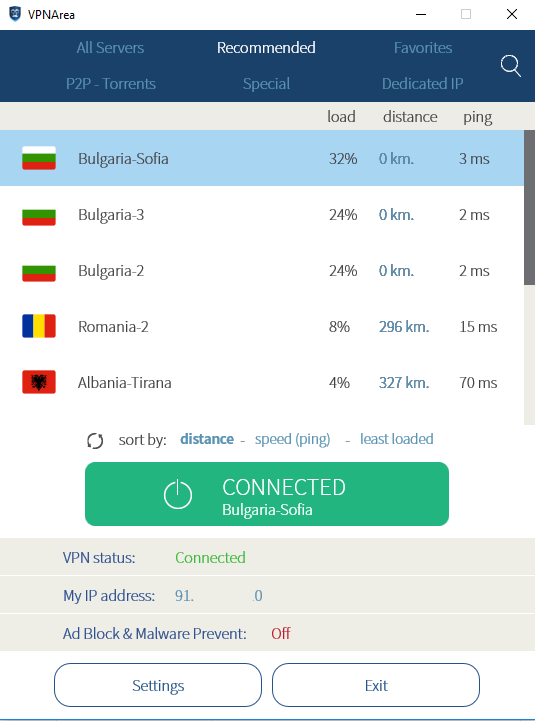
On top of the app you will see few different tabs:
- "Recommended" shows servers nearest to you in terms of distance.
- "Favourites" shows servers you most frequently connect to.
- "Dedicated" shows exclusive servers of users who have bought dedicated IP address and private VPN server.
- "Special" shows servers that can unblock Netflix, Hulu, Amazon in both USA and UK. It also shows Double VPN servers.
- "P2P - Torrents" shows servers that are optimised for Torrent downloading.

- "Load" shows approximate load of server. Even if a server shows 100% you should still be able to achieve optimal performance, but for best speed result choose a server that is not too loaded.
- "Distance" shows distance in straight line between your city and the server. If sometimes you see a discrepancy it is because the Geo Information of IP addresses in the world is changing every day.
- "Ping" shows latency between you and server, the lowest the ping, the faster the connection should be.
You can also sort the servers by Ping, Distance and Load.


Settings

If you want to poke around for more control, there are plenty of settings you could change. However we advise to not do that unless advised by customer support or unless you know what you're doing.
- "Killswitch Nuclear" - It will disable your Internet in case of Unexpected disconnection. NOTE: Killswitch will not get executed if you click "Disconnect" button, as this is not unexpected disconnection. - "Killswitch Firewall" - It will disable your Internet via Windows Firewall (which must be ON) in case of Unexpected disconnection. Do note that sometimes Anti Virus software hijacks Windows Firewall and this option may become obsolete, in such case you should use the other Killswitch option above. NOTE: Killswitch will not get executed if you click "Disconnect" button, as this is not unexpected disconnection. "AdBlock & Malware prevent" - this option will set your DNS servers to a set of VPNArea DNS servers that also serves as Ad Blocker and it blocks web sites and IPs associated with malware activities. This is not a substitute of Anti Virus program, but it is another addition in your line of defence.

"Custom DNS" - Allows you to choose your own DNS servers.
"Connection Port/Protocol" - Gives you the option to tweak the parameters of the connection. Often resulting in faster or slower speed, it could also help you connect in case default connection settings don't work in your firewalled environment.

There are 7-8 more settings related to automation, ease of use and security. They are all self-explanatory and you can check them out in the software or screenshots below.

All settings are set by default to default options that would be preferred by most users.